
Support: Locate GPS App Guide
The Locate GPS app is for tracking BrickHouse Security GPS units. It is free and available for Android phones, tablets, iOS smartphones, and iPads.
It features the following capabilities: tracking unit location and moving state, including trips, stops, and parks, monitoring data actuality or the time passed from the last message received, and latest events like trip, parking, fueling, theft as well as commands, when applicable.
Download
Download User Manual
Attached below is the Locate GPS App Guide.
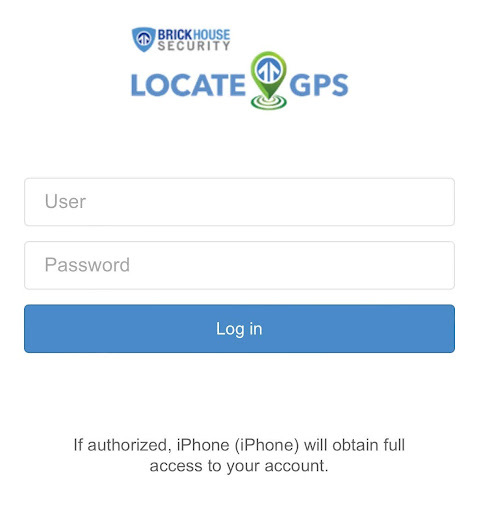
Log In
Please open the app and log in using the username and password provided in the email we sent you. Please note that the username and password are case-sensitive.
If you forgot your password, please reset it through the web browser by visiting brickhousesecurity.com/login/gps.
Monitoring
Once logged in, you will see the list of units active on the account under the Monitoring tab.
Adding units to the list
1. Select the Units or Groups tab.
2. Tap the icon located to the right of the search and tap Select items.

3. Select the required units or unit groups. You can use the search or the Select All button to the right of it. In addition, you can use the Select All button to select all the items filtered by the search.

4. Save the changes.
Viewing your Device - Info Tab
The Monitoring tab gives access to the main tracking features.
Swipe down to view in full size. Scroll upwards to view the tracker information.
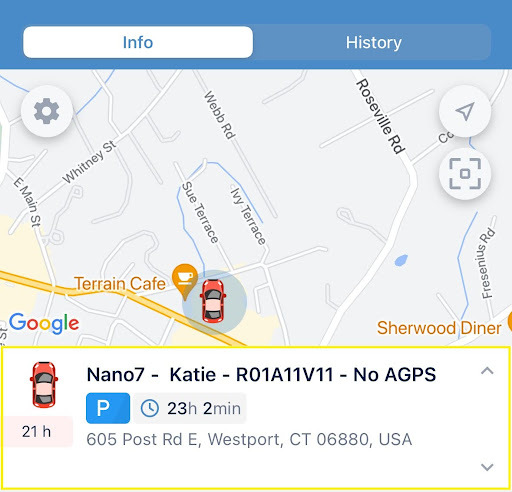
The General information section consists of tabs with unit properties.
To select the tabs you want displayed in the section, click Configure tab view at the end of the list and enable or disable the required tabs using the switch.
Indicated settings are applied to all the units at the same time.
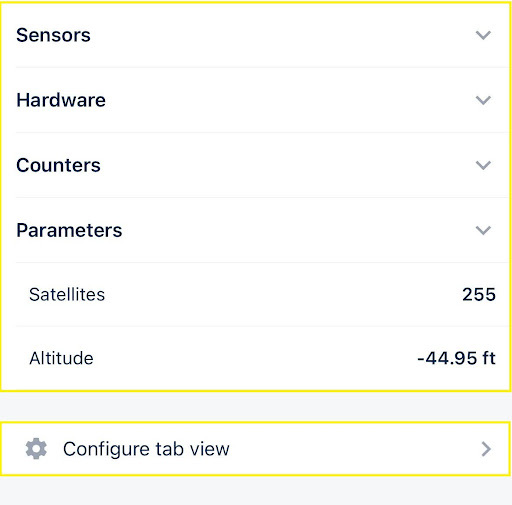
The following tabs can be available:
| Custom fields | The custom fields added on the same-name tab in the web version of the platform. |
| Sensors | Tap to show the current battery percentage of the GPS tracker |
| Profile | Unit characteristics specified on the Profile tab in the web version. |
| Hardware | Shows the Device Type, Unique ID or IMEI, and SIM card number |
| Counters | The readings of the Mileage, engine hours, and GPRS traffic counter
General Packet Radio Services traffic counter measures how much data is sent and received. |
| Parameters | The raw data received from the device. |
| Trailers | The trailers assigned to the unit. |
| Drivers | The drivers assigned to the unit. To the right of the driver’s name, you can see the phone number specified in the driver’s properties. To call the driver, tap the number. |
| Satellites | The number of satellites with which the connection is established.
Your GPS device can communicate with at least four different satellites at any given time, using this communication to transmit time and location information. |
| Altitude | Height above sea level |
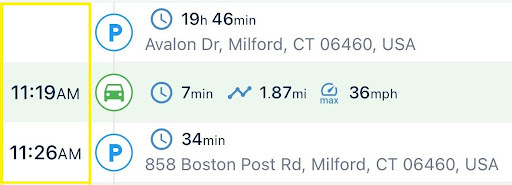
History tab
The History tab shows the past tracking location of the unit. By default, the data is displayed for the current day.
Selecting a date will display the historic tracking data for that day.

The top row shows summary info:
-
trip duration (
)
- track length in trips (
)
- parking duration (
)
![]()
Clicking on the time of the day will move the map to show the position where the unit was.
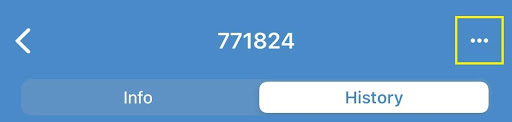
Device Additional Menu
The top panel displays the menu in the upper right corner which opens when you click on the menu button.
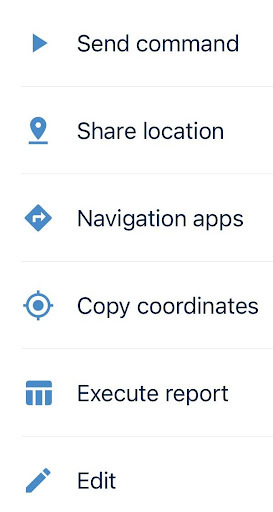
- Send command will send requests to your unit.
- Ping will help locate the unit easily
- Reboot will turn the unit off and on again
- Share location lets you provide a link that enables others to track your unit.
- Navigation apps will let you plan a route using another navigation app like Google Maps.
- Copy coordinates allow copying of the latitude and longitude of the unit to the clipboard so you can paste and search on mapping platforms.
- Run reports for the tracker you are currently viewing. See the Reports section of the guide for more details.
- Edit allows changing the name and icon of the unit.
Map
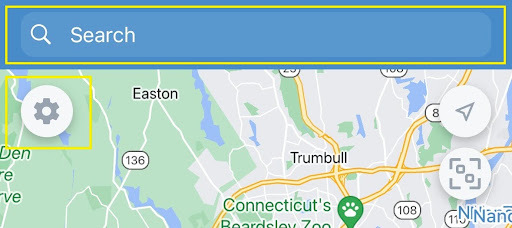
The map can be viewed by tapping the map icon at the menu located at the bottom of the page. All units selected on the monitoring tab will be displayed on the map. The default view will center on your trackers and zoom out to a level that shows all of your units.
Interacting with Map
To quickly find a specific unit, type its name in the search bar.
To change any map settings (map layers, unit captions, and so on), tap the icon in the upper-left corner.
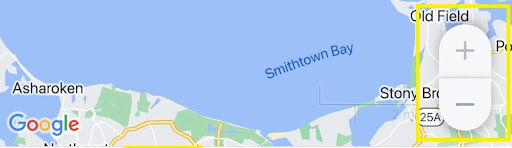
Zooming
Use +/- to zoom in and out or use the following screen gestures:
- Double tap - zoom in.
- Two fingers tap - zoom out.
- Two fingers stretch/pinch - zoom in and zoom out, correspondingly.
- Double tap without releasing on the second tap, and then slide the finger down to zoom in or up to zoom out.
These controls can be enabled or disabled in the ‘Map Settings’ mode from the main Settings.
Tilt Gestures
You can tilt the map by placing two fingers on it and moving them up (increasing tilt angle) or down (decreasing tilt angle).
Map Rotation
To rotate the map, place two fingers and apply a rotation motion. After the map has been rotated, a compass icon appears in the top right corner. Tap it to return the map to the default position.
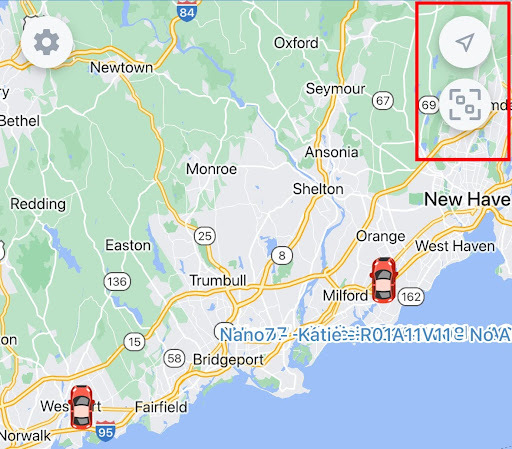
Finding your own location
To find your own location on the map, tap the icon . As a result, the map focuses on the location of your mobile device, and the icon turns blue. When you move around the map and lose the location marker, the icon
changes to
tapping which centers the map on the location of the mobile device.
To return to the device’s current location, tap the icon.
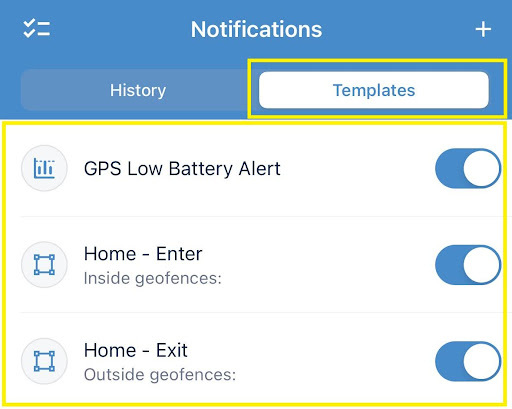
Notifications
On this tab, you can view and delete the received notifications, create, edit, and delete the notification templates, and enable and disable notification sending for each template.
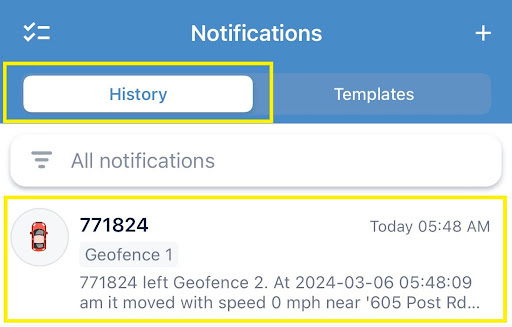
The Historysection lists all the received notifications (no more than 200).
To display only the notifications with a specific name, select it in the filter above the list.
A blue dot in the navigation bar indicates that you have unread messages. If the application is minimized, the number of new notifications is shown on its icon.
The Templates section contains a list of all the available notification templates created in the application and web version. You can see an icon of the selected notification type to the left of the template name.
- To edit, tap the line with it in the list, and make the required changes.
- To delete a notification template, swipe left and click the bin icon
Notification Types
You can choose the notification type based on the triggering conditions when creating a notification.
You can create four types of notification templates in the application: Geofence, Speed, Alarm (SOS), and Parameter in a message.
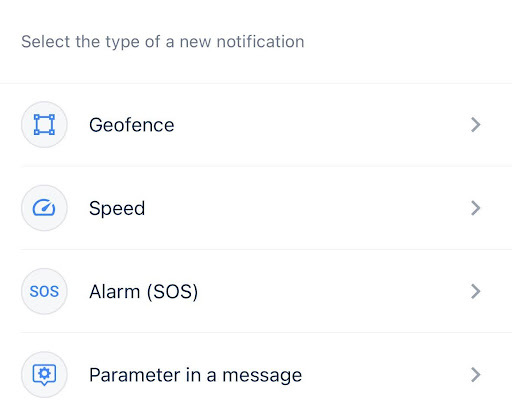
- Geofence
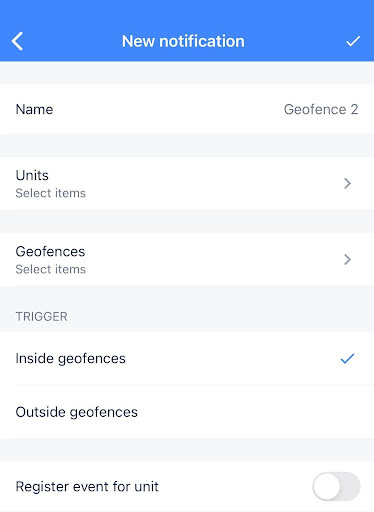
Below are the steps to configure a notification of the Geofence type.
- Name the geofence.
- Select the units.
- Select the geofences for which the notification should be triggered.
- Select when the notification should be triggered:
- when the unit enters the geofence (Inside geofence)
- when the unit leaves the geofence (Outside geofence).
- Turn on the Register event for unit to register the triggered notification as events that can be available on the History tab of the unit and or in reports.
- Tap the
to save the changes.
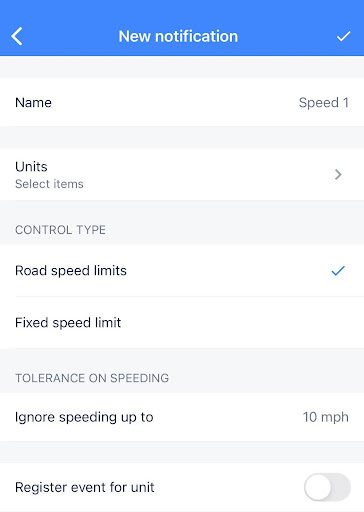
- Speed
A notification of this type allows monitoring of the vehicle's speed.
- Name the speed notification.
- Select the units.
- Select the Control type
- Road speed limits: The notification is triggered if the speed limits from maps are violated. For this control type, you can specify the number of kilometers per hour by which the limits from maps can be exceeded (the Tolerance on the speeding field).
- Fixed speed limit. The notification is triggered if the speed value is above or below the specified range (the Min and Max fields)
- Tolerance in Speeding: Ignore speeding up to your preferred speed limit.
- Turn on the Register event for the unit to register the triggered notification as events that can be available on the History tab of the unit and or in reports.
- Tap the
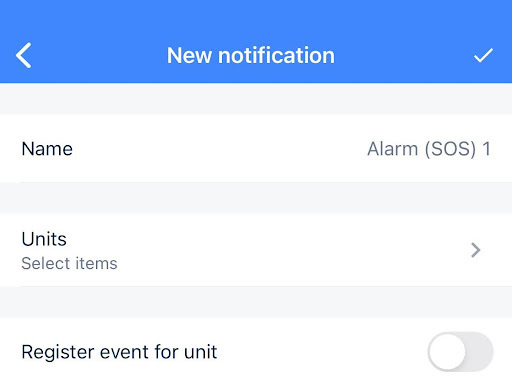
- Alarm SOS (For Spark Nano only)
A notification of this type is triggered when the system receives an alarm message from the unit. Only by pressing the SOS button on the Spark Nano will trigger this alarm.
- Name the SOS notification.
- Select the units.
- Turn on the Register event for unit to register the triggered notification as events that can be available on the History tab of the unit and or in reports.
- Tap the
- Parameter in a message
This type of notification enables you to manage sensor parameters in messages. It allows you to control the parameters transmitted by the device but does not confine the control of virtual parameters such as sats, speed, lat, etc. If you wish to configure a custom notification of this type, please contact us at 800-654-7966.
Deleting received notifications
- Tap the icon
.
- Select the necessary notifications. To mark all the notifications, select the check box above the list.
- Tap the icon
again to confirm the deletion, or the cross-shaped icon to cancel the action.
You can also delete notifications directly from the list by swiping the line with the notification to the right or left.
Reports
To execute a report, follow the steps below:
1. Select a report template.
- Geofence- Alert History
- Location History - All tracking updates
- Trips and Parkings - Start and end points of all trips
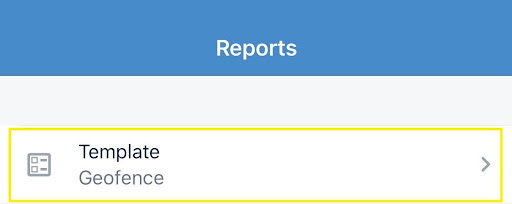
2. Select a unit/ group (depending on the selected template, the list shows all the available objects).

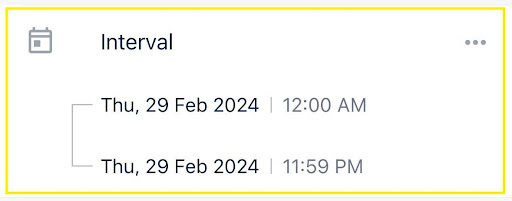
3. Specify the time interval. You can set it using the 'quick interval' (tap the icon ) or manually. To specify the interval manually, tap the start and end lines, and select the required dates and times. If you select the Week or Month quick interval, the report runs for the last full week or the last full month.
4. Select the page orientation of the report.
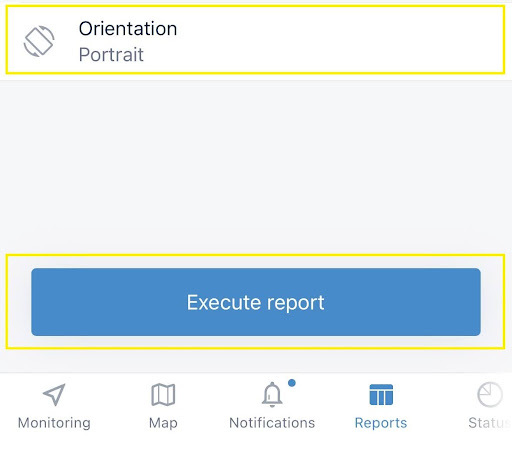
5. Tap Execute report.
The report is opened as a PDF file. You can open it in another application, send it by email or messenger, and so on (the icon in the screen's upper-right corner).
The template, object, and page orientation selection is saved until the next time you run the report.
Status
This tab shows the most recent status reported by your trackers.
Each status will display a number showing how many units are in that state. You can click a status to see a list of those units. From here you can go to the unit's extended information or additional menu.
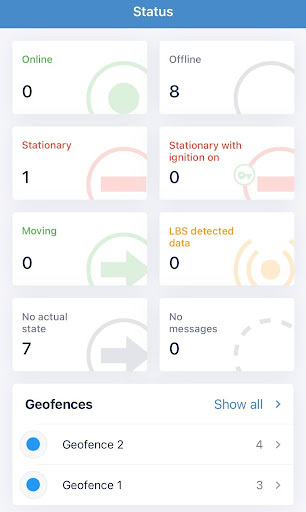
| Online | The units that are connected to the server or the units sent messages within the tracking interval |
| Offline | The units that are not connected to the server.
The device is not powered on or not connected to a power source. |
| Stationary | The unit is connected to the network but is not currently moving. |
| Stationary with ignition on | The stationary units with the ignition switched on (if there is an engine ignition sensor configured).
Applicable for TrackPort units and Livewire Dash |
| Moving | The units that are moving at the moment. |
| LBS detected data | The units that have sent data using LBS detection.
The LBS detector is a tool that allows you to find out the last unit location using cellular base stations. |
| No actual state | The units that have not sent data.
The device needs manual troubleshooting. |
| No messages | The units that have not sent any message yet.
The units are active but have not yet registered or started tracking.geofence |
| Geofences | View how many of your trackers last reported from inside your geofences. This will display your top 3 geofences, but you may select Show all to view more.
Requires set up of geofences on your account. |
Geofences
Geofences can be used to monitor units’ activity inside or outside of these areas. You can only create circle-shaped geofences in the application. Creating Polygon and Line Geofences is only available via a web browser.
Two modes are available on the tab: Geofences and Groups. In the Geofences mode, you can create geofences and perform the following actions with them: editing, copying, deleting, and creating notifications about crossing geofence borders.
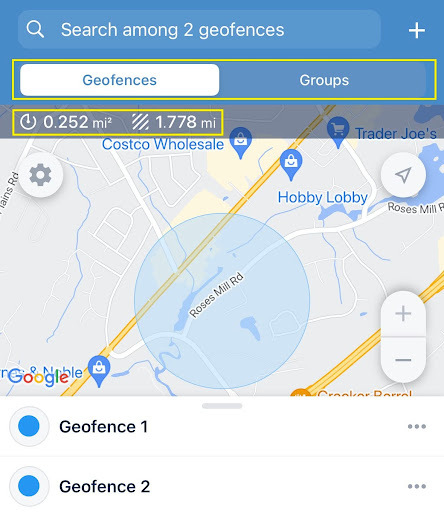
In the upper-left corner of the map, you can see the area and perimeter of the selected geofence. Drag the top border of the list to expand it to full screen.
To find a specific Geofence, type in the name of the geofence in the search bar.
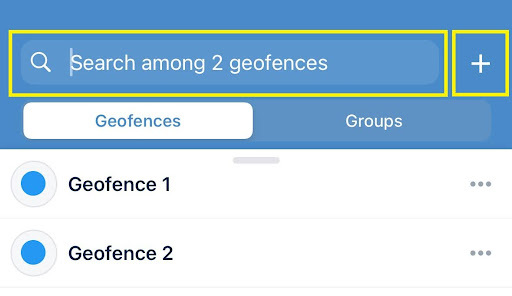
To create a geofence, follow these steps:
1. In the Geofences tab, tap the icon to the right of the search bar or select Create Geofence in the menu that opens after a long tap on the map.
2. Type in the name of the geofence and tap Save.
3. Turn on your location to center the map to your local area. Select the location and the size of the geofence moving and scaling the map.
4. Select the color.
5. If necessary, specify the description. By default, the address of the central point of the geofence is specified.
6. Specify the visibility value of the geofence (from 1 to 19).
Range of values from 1 to 19, where 1 is the most detailed scale (small streets, houses), and 19 is the general plan (world map).
7. Create a notification to specify the trigger condition: when the unit is inside or outside of the geofence. For complete information on how to set this up, kindly refer to the Notifications setting.
8. Save the changes.
Creating Geofence Groups
To create a geofence group, follow these steps:
- In the Groups mode, tap the icon
to the right of the search bar.
- Type in the name of the group and tap Save.
- If necessary, specify the description of the group.
- Select the geofences that should belong to the group.
- Save the changes.
Managing geofences
A tap on the iconor a long tap on the geofence in the list opens its menu.
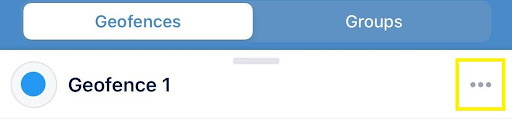
The menu can contain the following actions:
 |
Description |
Show or edit the geofence description. To edit the description, tap the icon in the upper-right corner. |
|
Edit |
Edit the geofence properties. The set of editable properties depends on the shape of the geofence and the access rights of the user. For polygons and lines, you can edit their name, color, description, visibility, and group. Besides, you can edit the description using the Show description action. For circles, you can also change their location and size. |
|
|
Copy geofence |
Copy the geofence. Available only for circle-shaped geofences. When performing this action, color, and size are copied. Also when creating a geofence, you can change its size, select the location, and specify the properties. |
|
|
Make invisible |
Hide the geofence on the map. The geofence is displayed again if you tap it in the list. To hide all geofences, use the Geofences option in the settings. |
|
|
Create notification |
Create a notification template of the Geofence type. See the details below. |
|
|
Delete |
Delete the geofence. |
Settings
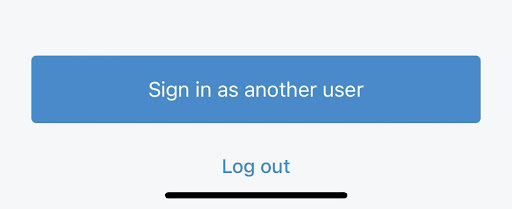
Changing the user and exiting the application
At the top of the settings screen, you can see the name of the user logged in to the application. Tap it to open the page with the list of available accounts (if there are any). Select the account or tap the Sign in as another user button to authorize a new user.
To exit the application, tap Log out.
Interface customization
This section includes the settings applied to the map, navigation bar, and the Info tab.
Theme
Here you can select a theme for the application: dark, light, or the same theme as the device.
Map settings
The options which can be available here are described below. You can also access these settings from any tab that contains the map.
| Map source | Selection of maps: Web GIS, Open Street Map, Google Defaults, Google Satellite, Google Terrain, Google Hybrid, Yandex.
Google Maps are used by default when logging in to the application for the first time. |
| Traffic | Activation of the traffic jams layer. The option is available if Google or Yandex Maps are used.
Google Traffic Jam layers are part of Google Maps' extensive functionality for providing real-time traffic information to users |
| Unit icons | Display of unit icons on the map. If the option is disabled, motion state signs are displayed instead of icons.
Motion state signs:
|
| Unit names | Display unit names on the map. If the option is disabled, the names of units are not displayed on the map. |
| Driver names | Display a driver's name on the map if the driver is assigned to a unit.
If several drivers are assigned to one unit, their number is displayed instead of the names. In this case, you can see the names of the drivers on the Info tab of the unit. The Driver settings can only be set up on the web platform. |
| Icon grouping | Replacement of overlapping unit icons with an icon with a numerical indicator. If there are more than 100 units in the list, this option is enabled automatically when you open the map. |
| Unit trace | Display of a short line corresponding to the latest unit movements on the map. The option is enabled by default.
The trace is not shown for grouped unit icons and if there are more than 100 units. |
| Geofences | Activation of the geofence layer on the map. You can see all the geofences available to you. To see the names of geofences on the map, activate the Display names of geofences on map option in the user settings of the Wialon web version. |
| Zoom buttons | Display zoom buttons on the map. |
Navigation bar
Here you can change the order of tabs in the navigation bar or hide rarely used tabs. To do this, move a tab to the right position holding the icon or drag the tab to the Hidden tabs section respectively.
Unit view
The options available here affect the way the unit section looks on the Monitoring tab: in the work list, in the unit information, and in its history.
Below are the options and their possible settings.
| Title | Unit name or Driver name |
| Subtitle | Driver name; Unit name; Address where the unit is located; or Geofence within which the unit is located |
| Indicators and sensors | In the Indicators section, you can select any of the items or all of them:
In the Sensors section, toggle on/off the battery
|
"Info" tab settings
Here you can select the tabs with unit properties that should be displayed in the unit information. To do this, enable or disable the required tabs using the switch. The indicated settings are applied to all the units at the same time.
Notifications
To set up email and text notifications, please log in to the web platform.
|
Push notifications |
Activation of notifications in the application and push notifications in the mobile device |
| Ringtone | Selection of notification sound. |
| Events from notifications in unit history | Enable this option so that the unit history shows all events registered through notifications with the Register event for unit action (created in the web version of Wialon). |
Other
| Geofences as addresses | Display of information about the unit location in geofences instead of address information. |
| Auto-Lock | Selection of a screen lock mode.
|
|
Change password |
User password change. You should specify the old password and the new one. The latter should meet the security requirements.
The option is available if the Can change password option is enabled in the user properties. |
Help
This section features a Troubleshooting button that you can use to contact our Tech Support team. When you click the button, it will prompt you to send an email with details about your app and mobile device version. Our support representatives will receive the email and reply to you as soon as possible to assist you with your issue.
Thank you for choosing BrickHouse Security for your GPS tracking solutions. We are committed to providing you with reliable service and support.
If you require further assistance or have any questions regarding our products or services, please don’t hesitate to contact us through any of the following methods:
-
Phone: 800-654-7966
-
Live Chat: Available at BrickHouseSecurity.com
Our support team is here to help ensure you get the most out of your GPS tracking experience.
Jan 9th 2025