
Support: BrickHouse BPS User Guide
Log In
Please go to brickhousesecurity.com/login/gps

To log in, enter the username and password provided in the login email you received. Remember, the characters in these fields are case-sensitive. Upon first logging in, you will be prompted to update your password; follow the instructions to set a new password.
Getting a New Password
If you have already registered in the system but forgot your password, click the "Forgot password" link. Enter the email address you registered with and click "Next."
For enhanced security, multi-factor authentication is required. You will be asked to validate either by email or SMS. Enter the One-Time Password (OTP) you received and create a new password.
Navigating on the Map
The layout of the BrickHouse GPS platform was intended to be simple and intuitive. If you’ve ever used an online map, it should seem familiar. When you log in, the map will be centered on your active device or devices.

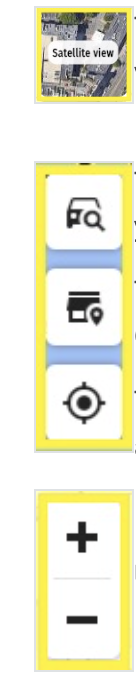
The button in the lower-left corner of the screen toggles between a traditional map view and a satellite view.
The top button activates the Follow units on the map function. When selected, the map will move to follow your devices if they are in motion. Deselect this option if you want to explore the map freely.
The middle button controls Points of Interest. When selected, the map will display local information from Google, including the names of businesses, parks, and monuments.
The bottom button resets the zoom level to neutral and centers your selected trackers. If you scroll around a lot and lose track of your devices, select this icon to reorient yourself.
Use +/- to zoom in and out.
Viewing your Device Info
Clicking on your device’s icon or label will open a window displaying basic information such as the battery level if the device is battery-powered, the time of the last report, and the last reported address.
If you need to search for more information, you can press the "Copy address" button to paste the last reported location into a browser window.

Top Menu
The top menu allows you to select what to display on the map. Youcan use the date range to quickly view preset date ranges or select Custom to open the full Trips Report. The date range will default to the Live view which displays where your tracker is currently.
The "View" dropdown menu displays established geofences, trips, my location, or all. By default, the system shows your device's last reported (Live) location along with active trips and geofences on the map.

The Main Menu
Use the button in the upper left corner of the screen to open and close the Main Menu. In the Main Menu, you can view all your tracking devices and select which ones appear on the map.
You can also set up new alerts, edit existing ones, run activity reports, and access account settings.
Trackers
Click on "Trackers" to view a full list of the devices associated with your account. Devices with the "Select" button checked on the left will display on the map.

Battery-powered devices will show their current battery status. Battery-powered devices that require recharging will show an icon with their current status. GPS models that draw power directly from your vehicle will not display a battery icon.
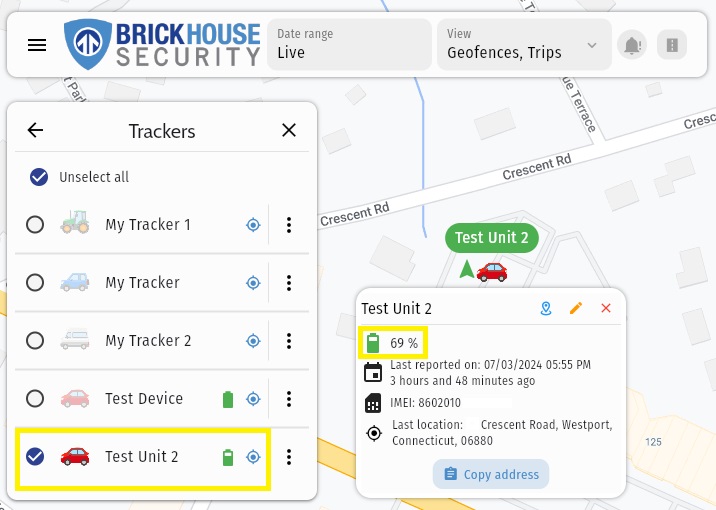
Clicking the "Focus" icon will center the map on the device’s last reported location.
Selecting the "Actions" icon will open a submenu.
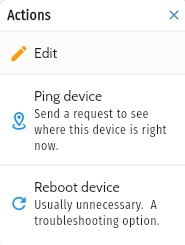
Choose "Edit" to customize your tracker’s appearance. You can rename the tracker, change the color in the device’s info box, and select an icon to represent the device. Make sure to click "Save" to apply your changes.
The "Ping" and "Reboot" device buttons are used for troubleshooting.
Alerts
The Alerts submenu displays all the alerts created on your account, showing their type and the notification methods (email and text message) they will use.

If you want to stop receiving notifications for an existing alert without deleting it, click the pencil icon, scroll down, select "Mute notifications," and hit "Save."
You can set up geofences, SOS, battery, maximum speed limits, and curfew hours aerts.
Click "Show Alerts history" to view a report of every alert triggered by the devices. You can filter it by date, tracker, and type of alert.
To create a new alert, click the "+ New Alert" button and select your desired Alert type.
Geofence
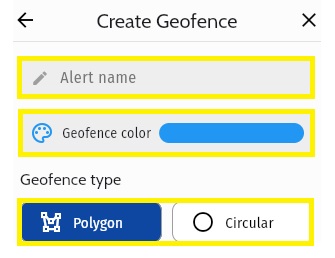
1. To create a geofence, click "Geofence" and enter a name in the "Alert name" field.
2. Select a color to help you identify geofenced areas on the map or to associate a color with a particular tracker.
3. Choose "Circle" or "Polygon".
Here are the basic rules for mapping a polygon geofence:

- Enter the address and click the magnifying glass icon
- Click on any spot on the map to put the first point. Then, add more points using the same method. Put the points as close or as far from each other as you want.
- To delete a point, click on Undo point.
- When finished, click Done.
Here are the rules for mapping a circular geofence:

- Enter the address and click the magnifying glass icon
- Click on the spot on the map you want the geofence to be cantered. You can move the center of your geofence by selecting the dot on your map, and while holding down your mouse key, drag the dot to where you want the geofence centered on the map.
- To increase the size of your geofence, change the number in the Radius, Mi box until your geofence is the size you want.
- You can zoom in on the map for more detail. The default geofence area is 100 feet.

4. Next, select "Geofence entry" to trigger an alert when a device enters the defined area, and "Geofence exit" for when it leaves. Choosing both will alert you whenever the device crosses the boundary, either entering or exiting.
5. In the "Trackers" dropdown, select the trackers that will trigger this geofence.
6. Choose your preferred notification method(s): email, text message, or both.
7. Click + Add email to add multiple email addresses to receive the alerts.
8. Click + Add phone and enter the phone numbers as numerical characters only, without dashes or parentheses.
9. Finally, click the "Save" button to save your geofence. If you do not click "Save," your geofence will not be saved.
Speeding
To create a speeding alert, click "Speeding" and enter a name in the "Alert name" field.
- Enter a speed threshold by specifying the number of miles per hour.
- In the "Trackers" dropdown, select the trackers that will trigger this geofence.
- Click + Add email to add multiple email addresses to receive the alerts.
- Click + Add phone and enter the phone numbers as numerical characters only, without dashes or parentheses.
- Finally, click the "Save" button to save your alert. If you do not click "Save," your speed alert will not be saved.

Max Speed
1. Choose an alert name that will appear in any notification sent for this alert.
2. Enter the speed in miles per hour in the "Max Speed" field.
3. Select the trackers that will trigger this alert from the "Trackers" dropdown.
4. Choose to send notifications via email, text, or both, and enter the appropriate contact information. Enter phone numbers as numerical characters only, without dashes or parentheses.
5. Once you’re finished, hit the "Save" button.
Curfew
Curfew Alerts notify you when a device moves during a specified period. For example, a curfew alert could be set to trigger if a vehicle moves between midnight and 6 am. A device can be associated with multiple curfew alerts.
1. Choose an alert name that will appear in any notification sent for this alert.
2. Choose a start and end time for your alert. You can set the alert to be active on particular days of the week or every day.
3. Select the trackers that will trigger this alert from the "Trackers" dropdown.
4. Choose to send notifications via email, text message, or both, and enter the appropriate contact information. Enter phone numbers as numerical characters only, without dashes or parentheses.
5. Once you’re finished, hit the "Save" button.

Battery
Battery Alerts can be set up only if you have battery-powered trackers associated with your account. These alerts notify you if your device’s battery drops below a set threshold. GPS models that draw power directly from your vehicle will not be listed in the Trackers list on the alert setup.
1. Start by choosing an alert name, then select a battery level from the dropdown.
2. You can program alerts to trigger when the battery drops below 60%, 50%, 40%, 30%, or 20%.
3. Next, select the devices you want to monitor from the "Trackers" dropdown.
4. Choose where notifications will be sent. Opt to receive notifications via email, text message, or both, and enter the contact information. Phone numbers should be entered as numerical characters only, without dashes or parentheses.
5. Once you’re finished, hit the "Save" button
.

SOS
SOS Alerts function only for the Spark Nano GPS Trackers.
1. Start by choosing an alert name that will appear in any notification sent for this alert, keeping it brief but descriptive.
2. Select the trackers that can trigger this alert from the "Trackers" dropdown.
3. Choose to receive notifications via email, text message, or both by using the check marks and entering the appropriate contact information. Enter phone numbers as numerical characters only, without dashes or parentheses.
4. Once you’re finished, hit the "Save" button.

Reports
The Reports section allows you to generate reports for historical data.
Trip

1. To run a trip report, select "Trackers," and choose the devices you want to see information from.
2. Toggle the "On road tracking" button on or off.
With 'On road tracking' turned on, BPS will smooth out your trip to align it with roads closest to where your device reported from. This feature is designed for tracking being done in cars and will make assumptions about which roads your vehicle traveled on.
In most cases, this feature will make your trip display more cleanly on the map, it may sometimes attribute your tracking data to a nearby road that is not where your device reported from. If you notice inaccuracies in your trip and have this feature turned on, you may want to disable the feature to see if that resolves the issue.

For tracking someone on foot or off-road, it is recommended to turn this feature off for an accurate representation of their path.
3. Click the "Calendar" icon to open the Date Picker, then choose a start and end date. Clicking the same date twice will generate a report for that day only.
4. When you select "Search", trips from the defined period will be drawn on the map, with checkered flag icons indicating where trips ended.

Individual trips will be listed below the "Search" button, showing the distance traveled, travel duration, and start and stop times. Selecting a trip from the list will center it on the map. Clicking the device playback is a way to control the playback of historical data on the map. Clicking the checkered flag icon will bring the map to the trip's endpoint.
To see the individual location points reported by the device zoom in and they will appear along the Trips line drawn on the map. You can click for more detailed info. Not available in On Road Tracking mode.
To download a report, click the "Download Report" button. BPS will export the data in a spreadsheet format, which may take a few seconds or several minutes for exceptionally long periods.
Most Frequent Locations
Heatmap that shows the areas where your device reports from the most.

Battery Level
The historical battery data provides the past battery levels of the devices within a specific time frame.
1. Select a tracker you would like to run a report on.
2. Select a day or date range. You can also click on the calendar to select your preferred days and click Search.
3. By default, it will show you the report in a chart visual. If you like to see the list, click the Event list icon.


Settings
The Settings section contains various account settings.
Username: The email address linked to the account. Contact us directly for username update requests.
Change Password: Choose a new password for your account. Remember, your password is case-sensitive.
Measurement System: Select whether distances will be displayed in miles or kilometers.
Timezone: Choose the timezone used throughout BPS. It defaults to the three time zones of the continental United States. Selecting "Show more" will expand the list to all timezones worldwide.
Mar 7th 2024