

How to Place a Battery Operated GPS Tracker: A Complete Step-by-Step Guide
Keeping tabs on a vehicle’s location has never been easier, thanks to the wide range of GPS tracking systems available today. Among them, battery-powered GPS trackers stand out for their portability and ease of installation. Whether you're a parent monitoring a teen driver, a business managing fleet vehicles, or a traveler safeguarding your rental car, learning how to place a battery operated GPS tracker properly can make all the difference.
In this comprehensive guide, we’ll walk you through everything you need to know—from choosing the ideal spot for your GPS tracking device to testing it for optimal performance. You don’t need technical knowledge or tools—just a bit of preparation, attention to detail, and a reliable GPS unit.
Why Choose a Battery Operated GPS Tracker?
Battery-operated GPS devices offer distinct advantages:
- No wiring necessary – avoids tampering with your vehicle’s electrical system.
- Portable – can be moved between vehicles or other assets.
- Quick setup – you’ll be up and running in minutes.
Unlike a hardwired GPS tracker or a device that plugs into the OBD II port, battery-powered models give you the flexibility to monitor virtually anything without needing to hard wire the tracker into a vehicle's battery.
Tools & Supplies Needed
You don’t need a toolbox for this job. Here’s what you should gather before getting started:
Supplies:
- Battery powered GPS tracker
- Magnetic case (optional, but ideal for exterior placement)
- Your vehicle
Tools:
-
No tools required – that’s the beauty of a battery-powered tracker.
Step 1: Fully Charge Your GPS Tracker
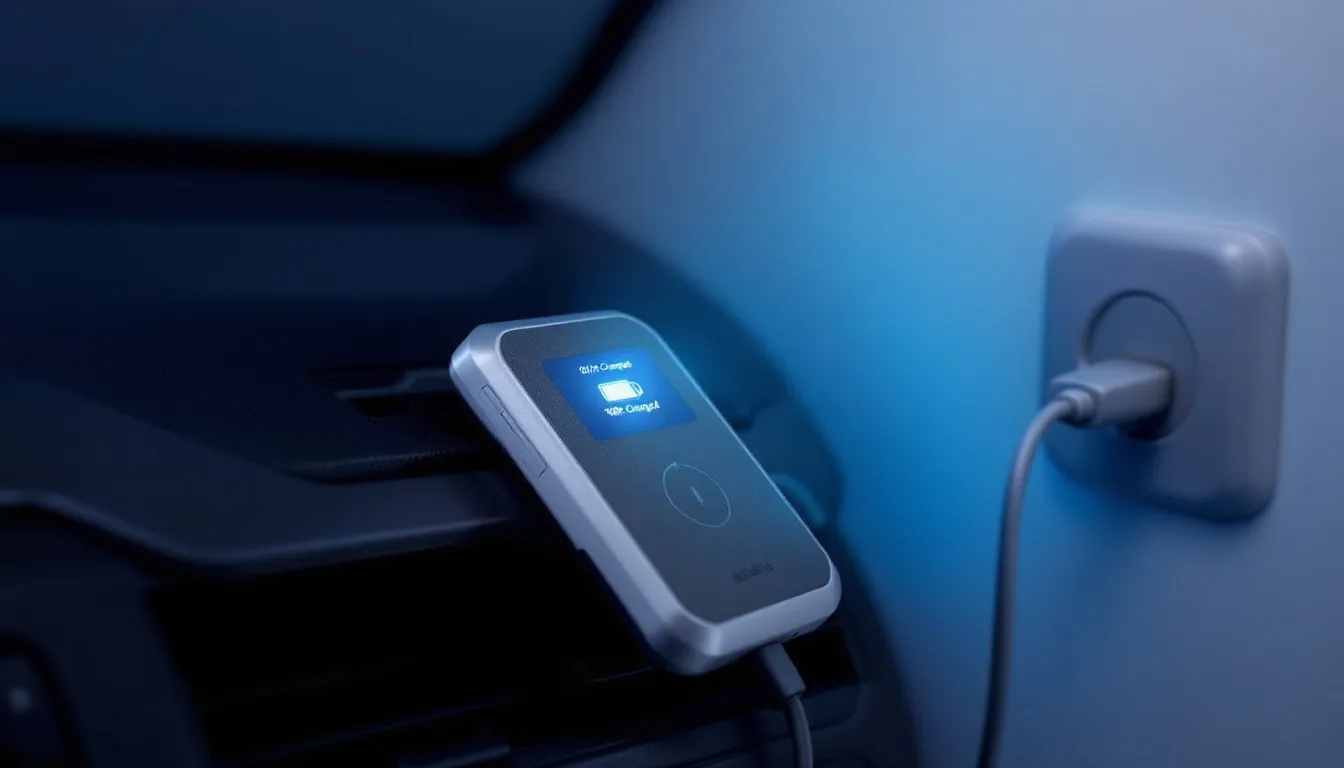
Before anything else, give your tracking device a full overnight charge. Most battery-powered units come with a USB cable or wall charger. Follow the manufacturer’s instructions to ensure it's powered to capacity.
Tip: Some GPS tracking devices will blink or light up when charging, and change color or turn off when fully charged.
Battery life varies by usage and model, but weekly recharges are common for real-time tracking. Light use or power-saving settings can extend the interval between charges.
Step 2: Choose the Right Location in Your Vehicle
Now that your device is charged, it’s time to find the best placement spot. This is where signal quality, concealment, and accessibility all come into play.
Recommended Locations Inside the Car
- Underneath the passenger seat – protected and fairly open to the sky.
- Inside a seat pocket – great for quick installs.
- Under the dashboard – but only if it’s not surrounded by metal or heavy insulation.
- Rear parcel shelf (under rear window) – good for signal reception.
- Inside a tissue box – for discreet tracking.
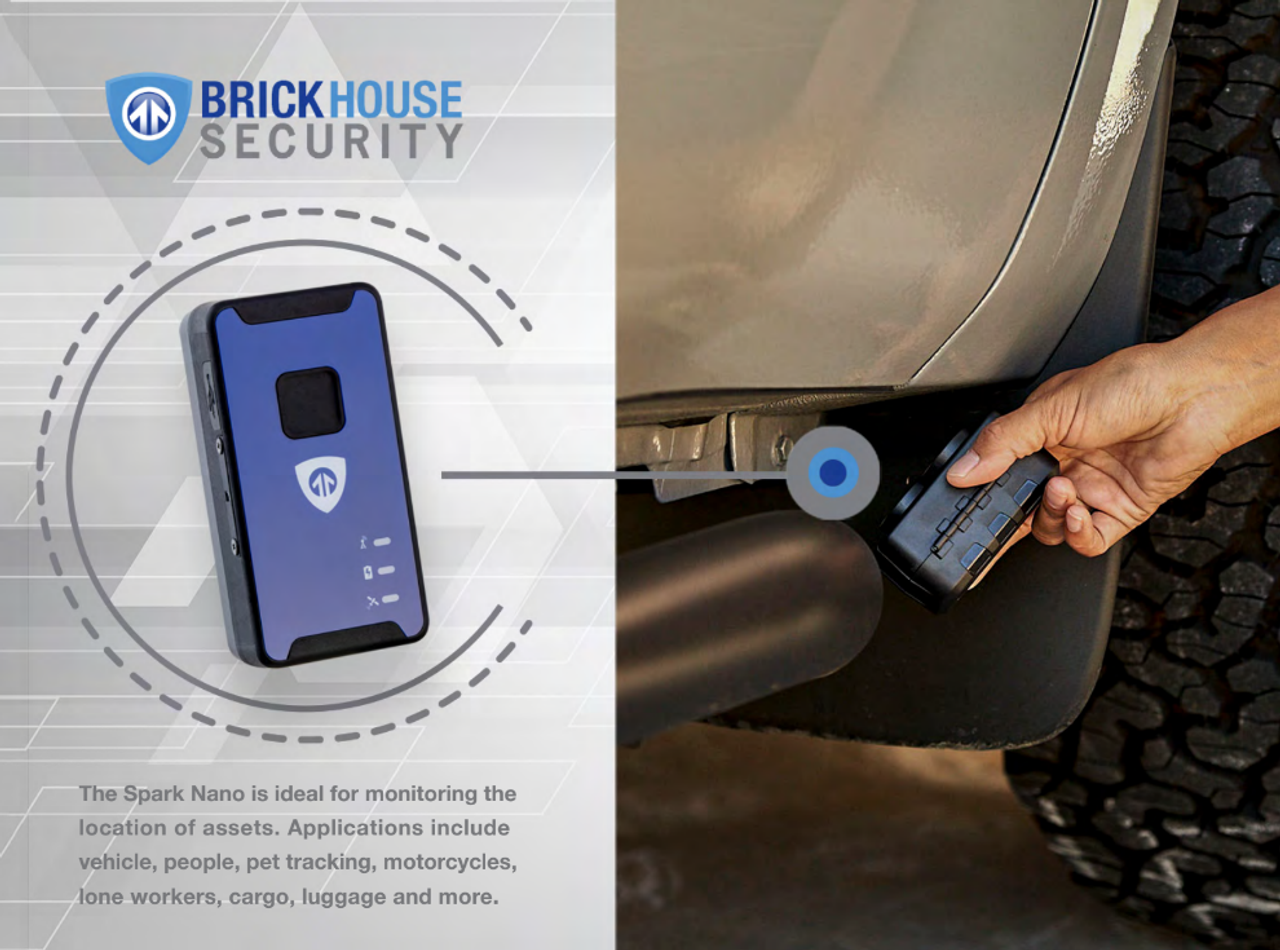
Recommended Locations Outside the Car (using a magnetic case)
- Under the front or rear bumper – ensure it’s secure and water-resistant.
- Inside a wheel well liner – use zip ties or a magnetic case.
- Behind the license plate – less visible but still effective.
- Attached to the vehicle’s frame – as long as GPS signal strength remains high.
Places to Avoid
- Glove compartment – too enclosed, weak GPS signals.
- Trunk – surrounded by metal, poor signal reception.
- Roof – easily discovered or exposed to elements.
- Engine bay (under the hood) – heat and interference.
- Near the steering column – lots of wiring and potential interference.
- Directly next to other devices – could impact performance.
Reminder: A clear line of sight to the sky helps your tracker connect with GPS satellites for strong signal and accurate data.
Step 3: Secure the Tracker in Place
Once you've found the chosen location, it’s time to secure the unit:
Mounting Tips:
- Magnetic GPS tracker users can attach the device under the vehicle using a weatherproof magnetic case.
- Use double-sided tape or Velcro for interior spots like under seats or in compartments.
- For long-term tracking, zip ties can help fasten the device under the car or in hard-to-reach locations.
Make sure the device doesn’t rattle or move around while driving, as motion can impact signal strength and battery life.
Step 4: Test the Tracker
Before relying on the tracker, it’s crucial to ensure it’s working properly.
- Place the tracker in your selected location.
- Start your car and go for a test drive—15 to 30 minutes should be enough.
- Log in to your tracking software or platform to review the trip data.
- Confirm that the car's location, speed, and route have been accurately recorded.
What to Check:
- Is the device showing real-time location updates?
- Are there any gaps in the route?
- Does the map show the car's location where expected?
If tracking seems spotty, relocate the tracker to a spot with better satellite visibility and repeat the test.
Step 5: Set Battery Alerts and Maintenance Reminders
The last step is ensuring you don’t lose track—of your tracker! Most GPS platforms allow you to set alerts or calendar reminders.
Battery Tips:
- Recharge weekly or according to the battery life specified by your model.
- Keep an eye on battery level within your tracking app.
- Set email or SMS alerts for low battery.
For units with replaceable batteries, schedule regular battery replacement to ensure continuous GPS tracking.
Bonus: Tips for Specific Use Cases
For Car Rental Companies
Tracking rented vehicles can help reduce liability and prevent misuse.
- Use an interior location for easy retrieval.
- Choose a tracker with tracking software that supports multiple vehicles.
For Fleet Managers
Place trackers in consistent locations across fleet vehicles for easy monitoring and maintenance.
- Set up group alerts for battery replacement and recharges.
- Use a combination of battery-powered and hardwired GPS trackers for long-term use.
For Parents Monitoring Teen Drivers
- Keep the tracker inside the car for safe retrieval.
- Use geofence alerts to notify if the car leaves predefined areas.
For Travelers or Vehicle Owners Concerned About Theft
- Choose a magnetic GPS tracker to mount under the vehicle for stealth.
- Ensure the tracker is hard to spot but still receives a strong GPS signal.
- FAQs
Can I use a GPS tracker without a power source?
Yes! That’s exactly what battery-powered GPS trackers are for. They don’t need to be connected to your vehicle’s electrical system.
Is it better to use a hardwired tracker?
It depends. A hardwired tracker offers constant power and is harder to tamper with, but installation is more complex and may require connecting to the red wire, black wire, or even the white wire in your vehicle. A battery-powered tracker is easier for most users to manage.
Can I simply plug a tracker into the OBD port?
Yes, OBD trackers are plug-and-play, but they’re easily discovered. For more discreet tracking, go with a battery-powered or installed inside option.
Final Thoughts: Why Placement Matters
Learning how to place a battery operated GPS tracker correctly ensures your device performs reliably, sends accurate data, and stays hidden when needed. Proper placement protects your investment and gives you peace of mind.
From the dashboard to the rear bumper, selecting the right spot based on signal strength, battery accessibility, and your specific tracking needs is key. Combine this with consistent charging and occasional test drives, and you’ll enjoy a robust GPS tracking solution that fits your lifestyle or business.
Summary Checklist
Before you hit the road, review this quick setup checklist:
✅ Charge your GPS device overnight
✅ Choose a discreet location with strong GPS signals
✅ Mount the tracker using magnets, tape, or zip ties
✅ Take a test drive and review tracking data
✅ Set calendar reminders for charging or battery replacement
✅ Use platform alerts to monitor real-time location and battery status
Posted by Kellie Kendall on May 11th 2024